Welcome to the Blogs portion of The Spider Catches the Fly. This blog focuses on the new beta version of Blogger, a free blog hosting website. This blog is available to you at any point in the future. It includes information that you can use to get started using a blog.
NOTE: It is best to use the Labels on the sidebar to navigate the various topics on this blog.
First I will introduce you to some of the basics of blogs.
Then, we will get our hands dirty as we will use individual training blogs to:
Change the look and feel of your training blog.
Change the title of your training blog.
Create a post.
Create a post that includes hyperlinks to other websites.
Create a post that includes an image.
NOTE: The blogs you will begin customizing are training blogs and will not be available to you after this class.
The main part of the blog is the posts area. This is where all new content appears. Posts are the "articles" that the author(s) of the blog create. This post area generally shows the last 10 posts, or all posts from the last two weeks, or some other limitation.
Each post will have a title as well as the date and time of the post. If your blog has multiple authors, it will show the author who created the post.
Each post will also have the ability to comment. This is the beauty of the blog, in that it allows for a certain level of interactivity with the readers.
Blogs also have a sidebar with various tools.
On the sidebar, you should find an Archive. Since the post area does not show all posts, you can use the Archive to find older posts.
You may also find another navigational tool called Labels. This can also be called Categories. Basically, this is an index or a table of contents that the author can create.
Some blogs may have a search box in which you can search their blog for specific content.
You will also find a Personal, or About Me, section in which you can view the author's profile.
You may also find a set of links to other sites or blogs.
You can adjust the permissions for you blog in order to add more authors or to restrict availability to certain people.
For example, if you want the contents of your blog to be available only to your staff, you can invite your staff members to join the blog. Then set the permission level so that only members can read your blog. This is useful if you will be using the blog for sensitive internal communications such as meeting minutes and such.
You can also have multiple authors in case you wanted to have a blogging team.
To set these permissions, click on the Settings tab. Then click on the Permissions section.
To add authors, click on Add Authors. A box will appear in which you can type the email addresses of the people you want to invite.
Under, Blog Readers, you have three options of who can read your blog: 1) Anyone; 2) Only People I Choose; 3) Only Blog Authors.
If you select Only People I Choose, a box will appear that will allow you to type the email addresses of the people you want to invite to read your blog.
Do you have time to wade through the vast amount of professional information on the Internet?
Do you need a professional web presence for your library but lack the budget?
Do you desire to utilize the power of the Web 2.0 to reach your customers but lack the technical expertise?
Would you like to use the social networking aspects of the web to create "communities of practice?"
Attend this MALC Fall CE event to bring the resources of the web to your desktop. Learn to utilize the latest free web authoring tools to create a professional online presence. Learn to utilize the power of Web 2.0 technology to collaborate and share knowledge with your peers.
When: Thursday, October 26, 2006
Where: Rhodes College; 2000 North Parkway; Paul Barrett, Jr. Library; Barrett--Room 128
Time: 1:00-4:00 PM
Fee: Free to MALC members; $10.00 for non-members (includes membership)
Instructors: Kevin Dixon, Technical Trainer, Memphis Public Library; Damone Virgilio, Staff Development Manager, Memphis Public Library
Registration: Contact Damone Virgilio, 415-2723 or virgiliod@memphislibrary.org
Throughout this blog, you have seen posts with pictures of objects on the screen. This is a wonderful way to add some spice to your blog. Here is a free download that can help you do that.
Flickr and Webimager allows you to copy the entire screen, an active window, or a specific part of the screen. You can then automatically upload the image to your flickr account.
Because you are limited in the amount of image space you can upload to Blogger (300 MB), I suggest that your organization register for a free Flickr account. The free account limits you to 20 MB per month; however, there is no final limit.
Flickr is a photo-sharing site that several libraries are utilizing. While many libraries are using it for an outreach tool, you can also use it to store web-based images that can then be inserted into blogs.
Once you upload photos to Flickr, you are given the HTML code that you can use to insert the picture to your blog.
Since your blog is on the Web, the pictures you add to your blog need to be on the Web as well. Blogger has a built-in tool that lets you easily add pictures to your blog. You can upload images from your computer or add the URL of a picture that is already on the Web.
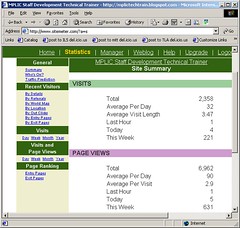
If you spend the time to create a blog, you will probably be interested in knowing how many people visit your blog. This will give you insight as to whether or not your blog is reaching the people you want it to reach.
Also, the tool I am about to recommend also gives you details such as how they got to your site in the first place. Do they perform a google search? Or did they access it from your own companies intranet?
If you scroll all the way down to the bottom, you will see a symbol that says "Sitemeter". If you click on that symbol, you will be taken to a site that tells you how many people have visited the site.
To add this to your blog, register with http://www.sitemeter.com. It is free. Site Meter offers an automated process to add the HTML to your blog, however, it is easier to just copy the HTML from Site Meter.
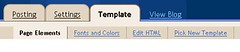
Then go to your Template tab and add a page element at the bottom of the page. One of the type of page elements you can add is a third party HTML or Javascript. Select that element and paste the HTML. The Site Meter will be added.
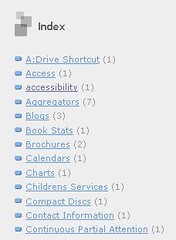
As librarians, this feature is a must. Using labels (or categories) allows you to provide a description for each post. All descriptions are then kept on the sidebar, allowing readers to find posts under certain topics.
Turning Labels On
To use this feature, click on Template tab. You should be on the Page Elements section. Click on Add a Page Element. A list of many elements will appear. Under Labels, click on Add Element. You can change the name from Labels to Index (or whatever). You can arrange your labels in alphabetical order (recommended) or by frequency.
Creating Labels
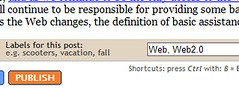
As you are creating your individual posts, you will see a box at the bottom that allows you to create your labels for the post. They will be added to the list automatically when the post is published.
Something that most blogs utilize is the Archive feature. This allows you to quickly find individual posts by date rather than by topic.
This is one of the default Page Elements, so nothing needs to be done to "turn it on". You can change the format of your archive by clicking on the Template tab. You should be on the Page Elements section. Click Edit on the Blog Archive element. A box will appear that will allow you to change the format of the archive.
Giving readers the ability to comment on your posts creates a level of interactivity that is not possible with static web pages.
As author, you can create your posts. However, the readers have the ability to add their input as well. Perhaps a reader has a different take on a topic. As author, you can also respond to peoples comments by adding your own comment. Next thing you know, interactive dialog is taking place in a manner that was not possible before.
Creating Comments
Before we go any further, it will be useful if we know how to comment. Below every post, you will see a Comment link. Click on it. As you will see below, every blog is different because everyone can adjust their commenting security. Do you have to log in or not?
You can modify commenting capabilities by clicking on the Settings tab. Then click on the Comments section.
You can turn comments off completely.
You can limit comments to blogger users, to anyone, or to members of your blog.
You can enable comment moderation. This is suggested, especially if you allow anyone to comment, as not moderating allows you to discard any spam or "bad" comments before they are put onto your site. When you choose to moderate, blogger will ask for your e-mail address. Comments will be sent to that address and you can then choose to publish the comment or not.
Also, when creating individual posts, you can click on Post Options and turn off commenting for the individual post you are creating.
You may find it necessary to change the date of your post. The default settings publishes the post at the current date and time. You can alter this so that the posting date is different from the current date and time.
If you save your post as a draft, Blogger will keep the original date that you started the post. So, if you created a draft of a post and then finished a week later, it would possibly not appear at the top of your page if you had created other posts between the time you saved the draft and the time you published. This could cause confusion for your readers. You can alter the date so that it appears as a new post.
Also, you can think of a post as a web page. The contents of your post may not be something that would be described as a post. Look at the blog below:
Under Links on the right, you will see a link to Staff Development Contact Information. I added this information to the blog, but I did not necessarily want it to appear as a new post. I altered the date so that it would not appear at the top of the page.
The Post Title is something you create for each individual post. Much like the Subject line on an e-mail, the post title needs to be a quick summary of the contents of the post.
The Title of the blog is something you create when you first register. The Title should be catchy yet pertain to the overall mission of the blog. The Description can be a brief sentence that adds to the Title.
Do not feel pressured during registration. You can change the title of your blog at any time. Keep in mind, if you change your title after you blog has been established, you may create confusion amongst your readers.
You can change this at any time by clicking on the Settings tab. The Settings tab has several sections (Basic, Publishing, Formatting, etc.). Under the Basic section, you should see your Title and Description. Or, under the Template tab, you will see several sections (Page Elements, Fonts and Colors, etc.) Under the Page Elements section, you will see the different elements of your blog (Title, Posts, About Me). Click Edit on the Title element and you can change the Title and Description.